
Have you ever plugged your smartphone charger into the wall, only to watch it immediately sag and fall right back out? Or perhaps you have noticed a faint, unsettling buzzing sound coming from the wall behind your television? If you are nodding your head, you are in exactly the right place.
When you learn how to perform an electrical outlet replacement safely, you do more than fix a minor annoyance. You actively enhance the safety, efficiency, and overall functionality of your modern household. Outdated, loose, or damaged receptacles are more than just an eyesore; they are hidden hazards waiting to cause trouble.
Why Replace Electrical Outlets
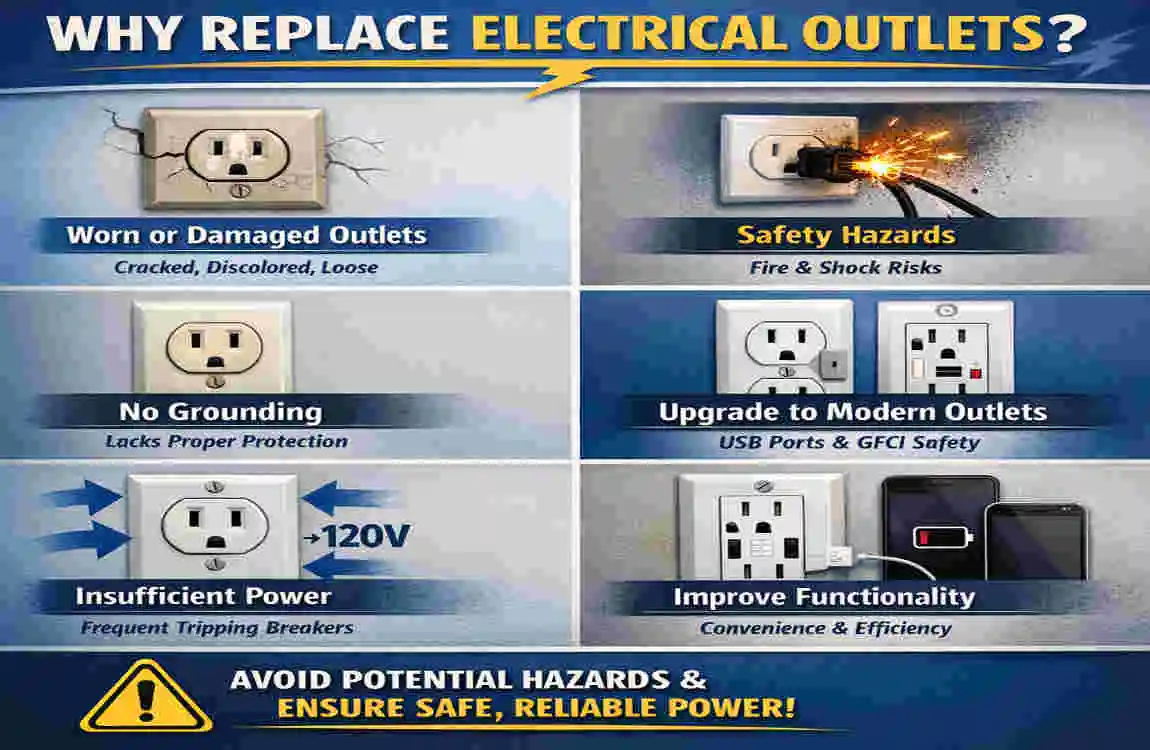
You might be wondering if it is truly necessary to replace the receptacles in your luxury home. After all, if they still provide power, shouldn’t you leave them alone? The short answer is no. Electrical outlets wear out over time, and ignoring the warning signs can lead to severe consequences.
The Inevitable Wear and Tear
Inside every standard wall receptacle, there are small metal contact points. When you push a plug into the slots, these internal metal contacts grip the prongs tightly to establish a secure electrical connection. Over years of daily use—plugging and unplugging vacuums, lamps, and chargers—these metal contacts lose their tension.
When those contacts become loose, the electrical current has to “jump” or arc across a tiny gap to reach the plug. This invisible arcing generates a tremendous amount of heat. Over time, this heat degrades the plastic housing and internal wiring, posing severe risks, including dangerous electrical shocks and devastating house fires.
Clear Signs You Need a Replacement
How do you know when it is time for an urgent electrical outlet replacement? Your house will usually give you clear warning signs. Keep a close eye out for the following red flags:
- Scorch Marks or Melting: If you see brown or black discoloration on the plastic faceplate, turn off the power immediately. This means extreme heat is building up behind the wall.
- Buzzing or Crackling Sounds: Electricity flowing properly is completely silent. If you hear a faint buzzing or crackling noise, it’s electricity arcing from loose connections.
- Plugs That Fall Out: If your cords will not stay firmly seated in the slots, the internal tension mechanism is entirely worn out.
- Warm to the Touch: A receptacle should never feel warm or hot. If it does, the wiring is likely failing.
- Two-Prong Relics: If your home still features old, ungrounded two-prong models, it is time to bring your electrical system up to modern safety standards.
The Benefits of Modern Upgrades
Replacing your old hardware is not just about avoiding disaster; it is also about improving your daily life. Upgrading to modern models drastically boosts your stunning home‘s overall value and energy efficiency.
For instance, modern building codes now require tamper-resistant (TR) models in residential homes, which feature internal shutters that block children from inserting foreign objects. You can also upgrade to smart models that connect to your home’s Wi-Fi, letting you control lamps and appliances directly from your smartphone.
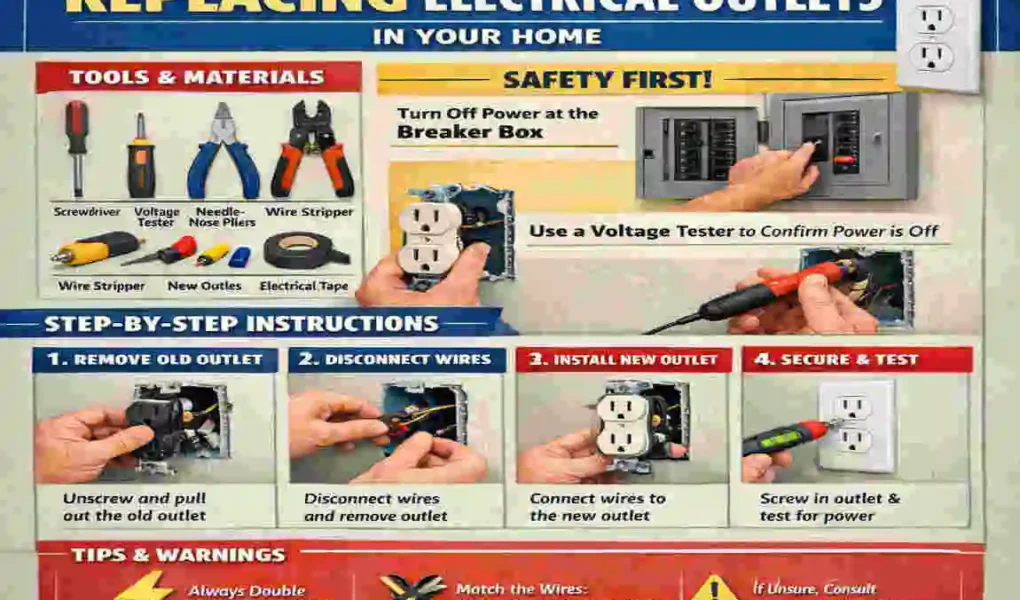
Tools and Materials Needed
Before you even think about touching your breaker box, gather the right equipment. Having the proper tools on hand makes the job infinitely easier, faster, and—most importantly—safer.
Essential Hand Tools for the Job
You do not need a massive toolbox to replace an electrical outlet. In fact, you likely already own several of these items. Gather these essentials before starting your project:
- Screwdrivers: You will absolutely need both a flathead and a Phillips head screwdriver. The mounting screws usually require a Phillips screwdriver. In contrast, the delicate faceplate screws are typically flathead to prevent over-tightening and cracking the plastic.
- Wire Strippers: This specialized tool allows you to safely remove the plastic insulation from copper wires without accidentally nicking or cutting the underlying metal.
- Needle-Nose Pliers: You will use these slender pliers to bend the ends of the bare copper wires into perfect little “J” shaped hooks.
- Insulated Gloves: While not strictly mandatory if the power is off, wearing insulated work gloves provides an extra layer of protection and gives you a better grip on the wires.
The Most Important Safety Tool: The Voltage Tester
If you only buy one tool for this project, it must be a non-contact voltage tester. This device looks like a thick plastic pen. When you bring the tip close to a live wire, it will flash a bright red light and emit a loud, continuous beep.
This tool is your ultimate line of defense. It tells you definitively whether a wire is “hot” (carrying electricity) or “dead” (safe to touch). Never, ever rely solely on the labels in your breaker box. Always trust your voltage tester. Budget around $15-$25 for a reliable model.
Choosing Your Replacement Materials
Next, you need to purchase the new hardware. Replacement units come in several varieties, including standard models, GFCI models for wet areas, and modern USB-integrated models.
You must match the amp rating to your home’s circuit. Check the breaker in your electrical panel that controls the room you are working in. If it says 15 amps, buy a 15-amp receptacle. If it says 20 amps, buy a 20-amp version. You can budget approximately $5 to $20 per unit, depending on the features you choose, plus an additional $20 to $50 for the essential hand tools if you do not already own them.
Safety Precautions First
We cannot stress this enough: always prioritize safety when dealing with your home’s wiring. Electricity is unforgiving, and there is absolutely no room for guesswork or taking shortcuts. Before you unscrew a single faceplate, you must establish a secure working environment.
The Golden Rule: Shutting Off the Power
The very first step of any electrical outlet replacement is turning off the power at the main breaker box. Locate your electrical panel, find the specific switch that controls the room you are working in, and firmly flip it to the “OFF” position.
Once you have flipped the breaker, verify that power is actually off. Walk back to the room and plug a lamp or a radio into the receptacle. If it does not turn on, that is a great start. Next, use your non-contact voltage tester. Insert the tip directly into the slots. If the tester remains silent and dark, the power is successfully disconnected. Make absolutely no assumptions here; always test physically.
Protecting Your Body and Environment
Work in dry conditions at all times. Water is a fantastic conductor of electricity, so you must never perform electrical work with wet hands or while standing on a damp floor. This is especially critical if you are working in a bathroom, a kitchen, or an unfinished basement.
Wear your protective gear, including close-toed shoes with rubber soles and your insulated gloves. Keep children and pets completely out of the workspace to prevent distractions and accidental slips.
Understanding Local Building Codes
Finally, check your local building codes. In many municipalities, homeowners are legally allowed to perform basic tasks, such as swapping out a standard wall fixture. However, some strictly regulated areas require you to pull a permit, even for simple DIY work.
A quick phone call to your local building department or a visit to their website can save you from future headaches. Ensuring your work complies with local regulations is vital, especially if you plan to sell your house in the future.
Step-by-Step Replacement Guide
Now that you have gathered your tools, chosen your materials, and prioritized your safety protocols, it is time to get to work. Follow this core, step-by-step process for a standard swap. Once you get the hang of it, you can expect this process to take 20 to 30 minutes per unit.
Shut Off Power and Test
As we discussed in the safety section, flip the appropriate breaker in your electrical panel. Walk back to your workspace and insert your non-contact voltage tester into the slots of the old unit. Double-check both the top and bottom slots. Ensure the tester gives you no warning beeps or lights. Your safety depends on this crucial first step.
SRemove the Faceplate and Outlet
Take your flathead screwdriver and carefully remove the small screw in the center of the plastic cover. Set the cover and the screw far aside so you do not lose them.
Next, grab your Phillips head screwdriver. You will see two long mounting screws holding the metal device frame to the electrical box in the wall—one at the top, and one at the bottom. Unscrew both of them.
Once the screws are loose, use your fingers to gently pull the unit away from the wall. Do not yank it! Pull it out just far enough to expose the wires attached to the sides.
Disconnect the Old Wires
Now you will see the wiring. You will notice terminal screws on the sides of the device. Pay very close attention to how they are connected.
- The black wire (the “hot” wire carrying the power) will be connected to the brass or gold-colored screws.
- The white wire (the “neutral” wire returning the power) will be connected to the silver-colored screws.
- The bare copper or green wire (the “ground” wire for safety) will be connected to the green screw, usually located near the bottom.
Use your screwdriver to loosen these terminal screws and unhook the wires. If the old unit used “backstabbing” (where wires are shoved into small holes in the back), use a small flathead to press the release tab, or snip the wires close to the plastic if you have enough slack in the wall.
Prepare the New Outlet
Take a close look at the ends of the wires poking out of your wall. If the exposed copper is frayed, brittle, or heavily nicked, you need a fresh start. Use your wire strippers to snip off the damaged ends.
Then use the strippers to remove exactly 1/2 inch of the plastic insulation, exposing fresh, shiny copper. Use your needle-nose pliers to bend the very end of the bare copper into a tight, semi-circular “J” hook.
Connect the New Wires
It is time to wire your brand-new hardware. Hook the “J” shaped wire ends around the new terminal screws. Match the colors perfectly: black to brass, white to silver, and bare to green.
Crucial tip: Always hook the wire around the screw in a clockwise direction. Why? As you tighten the screw clockwise, it pulls the wire tightly into the connection. If you wrap it counter-clockwise, tightening the screw will push the wire away, creating a loose and dangerous connection.
Tighten the screws very firmly. We highly recommend using the side terminal screws and actively avoiding the push-in “backstab” holes on the back of the unit, as backstabbed connections frequently come loose over time.
Step 6: install, Secure, and Test
Gently push the wired device back into the electrical box. You will need to fold the stiff wires neatly like an accordion so they fit inside without being pinched.
Secure the top and bottom mounting screws until the metal frame sits flush against the wall. Do not over-tighten, or you will strip the wall box. Replace the plastic cover using your flathead screwdriver.
Finally, walk back to your breaker box and flip the power back on. Return to the room and plug a simple tester or a lamp into your brand-new fixture to ensure everything works flawlessly!
Types of Electrical Outlets
Before you rush to the hardware store, you need to understand that not all wall receptacles are created equal. You must choose the right hardware based on your luxury home‘s location and your specific functional needs.
Below is a detailed breakdown of the different types you will encounter:
Outlet Type Best For Key Features Amp Rating
Standard Duplex General living rooms and bedrooms. Provides basic 120V plugs for lamps and TVs , 15-20A
GFCI Kitchens, bathrooms, garages, outdoors Features auto-shutoff mechanism for moisture protection 15-20A
Tamper-Resistant Homes with small children. Internal blocked slots prevent objects from entering 15-20A
USB Integrated Tech-heavy areas, home offices, bedrooms. Direct charging ports built right into the faceplate , 15A
240V Large appliances (ovens, dryers) Heavy-duty design for massive power draws 30A+
Understanding the Standard Duplex
The Standard Duplex is the workhorse of the modern home. You will use these in dry, general living areas like your living room, dining room, and bedrooms. They provide standard 120-volt power. When you do a basic electrical outlet replacement, this is usually what you are installing.
The Lifesaving GFCI
GFCI stands for Ground Fault Circuit Interrupter. These are absolutely mandatory by modern electrical codes in any area where water is present, such as bathrooms, kitchens, unfinished basements, and outdoor spaces.
A GFCI constantly monitors the electrical current. If it detects even the slightest “leak” of electricity (like if you drop a hair dryer into a sink full of water), the GFCI automatically shuts off the power in milliseconds. This instantaneous shut-off prevents fatal electrocutions. You must install these where code mandates.
Tamper-Resistant and USB Options
If you have curious toddlers running around, Tamper-Resistant (TR) models are a brilliant upgrade. They feature internal spring-loaded shutters. Unless two prongs are inserted simultaneously with equal pressure, the shutters remain locked, preventing a child from sticking a paperclip into the hot slot.
For modern convenience, USB-integrated models are fantastic. They replace the standard layout with standard plugs plus direct USB-A or USB-C charging ports. These are perfect for kitchen islands and bedside tables, allowing you to ditch those bulky charging blocks.
Common Mistakes to Avoid
Even though this is a highly accessible DIY project, there are plenty of traps you can fall into if you are not careful. Many DIYers make critical errors that compromise the safety of their homes. Let us shine a light on these common mistakes so you can easily avoid them.
Skipping the Voltage Testing
The most dangerous mistake you can make is unquestioningly trusting your breaker panel. Sometimes panels are mislabeled, or a single room might have wiring spread across two different circuits.
If you skip using your non-contact voltage tester, you risk touching a live wire and suffering severe electrical shock. Always test every single wire inside the box before you touch the metal.
Overtightening or Undertightening Wires
When connecting your copper wires to the terminal screws, finding the “Goldilocks” zone of tightness is crucial.
If you leave the screws too loose, the connection will vibrate over time, leading to dangerous arcing and excessive heat. Conversely, if you use brute force to overtighten the screws, you can actually crush and sever the copper wire. Aim for a firm, snug fit where the wire cannot be easily pulled out, but avoid cranking it down with all your bodily strength.
Mismatching the Amperage
You must respect the ratings of your home’s circuitry. Mismatching amps—specifically, installing a 20-amp model onto a 15-amp circuit—is a blatant code violation and a massive fire risk.
Here is why: A 20-amp device is designed to allow an appliance to draw 20 amps. However, if the wires hidden in your walls are only rated for 15 amps, pulling 20 amps through them will cause the wires to overheat, melt their insulation, and ignite a fire inside your walls. Always match the hardware to the breaker switch exactly.
Ignoring the Ground Wire
Never bypass the bare copper ground wires! The ground wire provides a safe path for stray electricity back to earth in the event of a short circuit. If you leave the green screw empty, any electrical surge could flow through the appliance housing—or worse, through your body.
Always inspect your electrical boxes for damage first. If you live in an older home and open a wall to find absolutely no ground wires, you need to stop your project and consult a professional.
When to Call a Professional
DIY work is incredibly rewarding, but knowing your limits is the hallmark of a smart homeowner. There are specific scenarios where an electrical outlet replacement completely exceeds basic DIY skills. In these cases, you must put down your tools and pick up the phone.
Dangerous Older Wiring Systems
If you open up your wall and discover silver-colored wires instead of copper, stop immediately. You likely have aluminum wiring. Common in homes built during the 1960s and 1970s, aluminum wiring expands and contracts differently than copper, making standard modern hardware completely incompatible. It is a known fire hazard that requires an electrician to use specialized anti-oxidant pastes and specific hardware.
Similarly, if you live in a historic home built before the 1950s, you might encounter knob-and-tube wiring. This system lacks a ground wire entirely, and the insulation is often dangerously brittle. Upgrading this requires a full professional rewire.
Complex Configurations and Overloads
If your home’s circuits are constantly overloaded—meaning your breaker trips whenever you run the microwave and toaster at the same time—simply swapping the wall hardware will not fix the core issue. You need a professional to pull new, heavier-gauge wiring from the main panel to the kitchen.
Likewise, complex jobs like working inside multi-gang boxes (where three or four switches and receptacles are crammed into one chaotic box) are incredibly confusing. Adding brand new locations to an empty wall is also beyond a simple swap.
When you opt for an electrician, expect to pay $100 to $300 per unit, depending on the complexity of the wiring and your geographic location.
Advanced Upgrades for Your Home
Once you master the basics of the standard electrical outlet replacement, a whole new world of home improvement opens up to you. You can truly elevate your living space by installing advanced upgrades that make your home smarter and safer.
Integrating Smart Technology
The future is here, and it fits right into your wall. Consider elevating your living room with smart outlets. These incredible devices connect directly to your home’s Wi-Fi network.
Once installed, you can use a smartphone app to set schedules for your lamps, track the energy consumption of your television, or turn off a forgotten curling iron while you are already at the office. They bring massive convenience and peace of mind.
Advanced Protection Systems
While you are upgrading your walls, you should also consider upgrading your breaker box with AFCI (Arc-Fault Circuit Interrupter) breakers. While GFCIs protect against water, AFCIs protect against hidden sparks and arcs behind the drywall. They provide unparalleled arc protection for bedrooms and living areas.
You can also install receptacles that feature built-in whole-home surge protection. Instead of relying on bulky, ugly power strips to protect your expensive computers and televisions, these sleek units absorb massive power spikes directly at the wall level.
If you are feeling ambitious, you can even learn how to relocate units by fishing new wires through the walls, placing power exactly where you need it. Executing these modern, high-tech upgrades can effectively boost your home’s resale value by 2% to 5%.
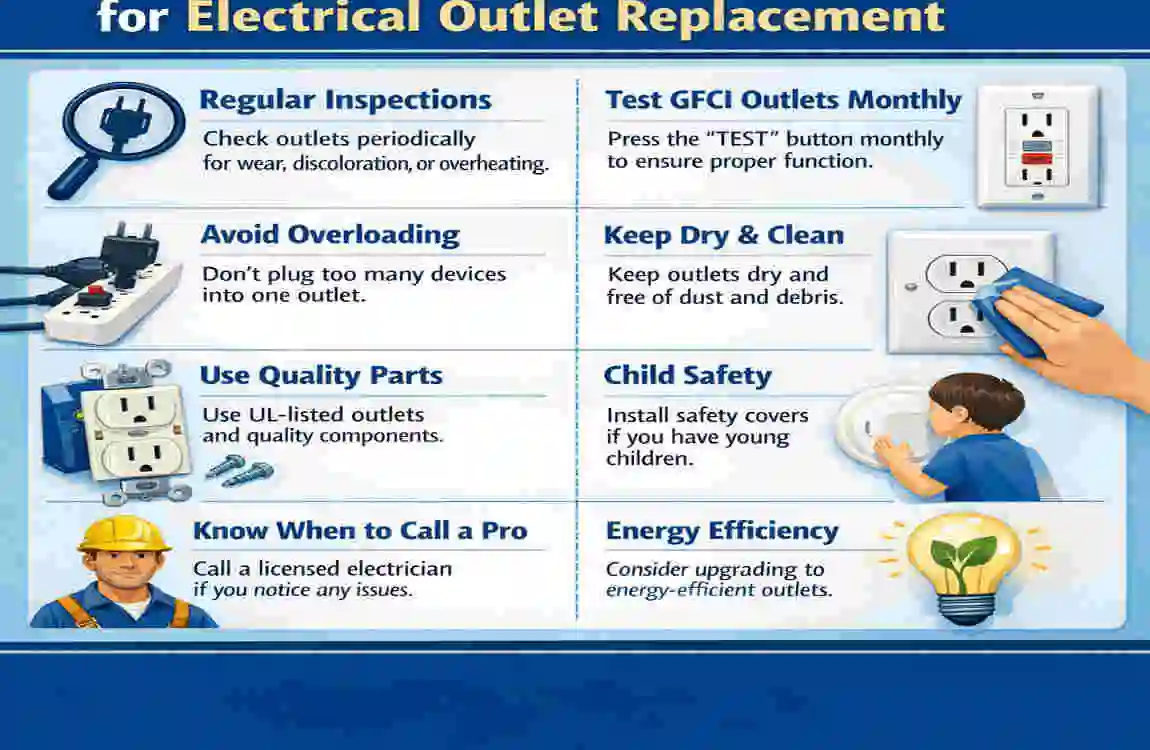
Maintenance and Long-Term Tips
Completing your DIY project is a great feeling. Still, your responsibilities do not end when you screw the faceplate back on. Proper maintenance is required to keep your electrical system running flawlessly for decades.
Routine GFCI Testing
Those GFCI units in your kitchen and bathroom have small “TEST” and “RESET” buttons on the front for a reason. The internal safety sensors can wear out over time.
You must test your GFCI units monthly via the test button. Simply plug in a nightlight, press the “TEST” button, and verify that the light turns off immediately—press “RESET” to restore power. If the button does not pop out, or the power stays on, the unit has failed and requires an immediate electrical outlet replacement.
Panel Management and Inspections
Take an hour this weekend to properly label your breaker panel. Use clear, descriptive tags (like “Master Bedroom Outlets” instead of just “Bedroom”). Having clearly labeled breakers grants you incredibly quick access during an emergency or your next DIY project.
Additionally, you should schedule full panel inspections with a licensed electrician every 10 years. They will tighten the lugs inside the main box and ensure everything is up to modern code. Proper electrical replacement extends your overall system life, reducing the strain on your wires and potentially cutting your energy bills by 10% to 15%.
Cost Breakdown and Savings
Let us talk numbers. Taking the DIY route for an electrical outlet replacement is one of the most cost-effective luxury home improvement decisions you can make.
The Ultimate DIY Return on Investment
When you hire a professional electrician, you are paying for their travel time, their expertise, and their overhead. This often results in a bill of $150 or more per unit.
By contrast, when you do it yourself, you save that $150+ instantly. Even if you factor in the cost of permits (roughly $50, depending on your city) and the initial investment in hand tools ($30), you come out massively ahead.
If you decide to replace ten outdated units in your living room, the savings become exponential. You can take advantage of bulk-buy pricing at big box hardware stores, bringing the cost of a standard unit down to under $3 each.
The Ultimate Electrical Outlet Replacement FAQ
Have you ever walked over to plug in your vacuum cleaner, only to have the plug immediately sag and fall right out of the wall? Or perhaps you have noticed a cracked faceplate in your living room and wondered if you could fix it yourself. You are definitely not alone.
Many homeowners feel intimidated by electrical work. We are taught to respect electricity, which often leads to fear of even the simplest maintenance tasks. However, performing an electrical outlet replacement is a highly manageable, incredibly common DIY project.
To help you gain confidence, we have compiled this comprehensive, long-form FAQ guide. We will answer your most pressing questions, break down complex electrical concepts into simple terms, and walk you through everything you need to know to safely upgrade your home’s wall plugs. Let us dive in and empower you to take charge of your home maintenance!
Can I really replace an outlet myself, or is it too dangerous?
Yes, you can absolutely do this yourself! It is a firm belief among home improvement experts that while you should never attempt jobs that have the potential to kill you—such as installing a brand-new main electrical panel—replacing an old, ugly, or broken electrical outlet is a task you can definitely handle . I promise you have the skills to pull this off safely .
The key to a successful DIY project is strictly managing the danger. Is it dangerous to work on live wires? Absolutely. That is why you must never attempt to replace a receptacle while the power is still live . As long as you follow the proper safety steps and kill the power at the source, the actual physical process of unscrewing and swapping the hardware is very straightforward.
How do I know it is time to replace an electrical outlet?
Your house will usually give you very clear warning signs when a wall plug is at the end of its lifespan. The most common annoyance is a lack of physical grip. If a receptacle no longer holds your plugs snugly, the internal tension mechanism is worn out, and it should be replaced immediately .
However, there are much more serious warning signs you need to watch out for. You must inspect your walls for any charring, burning smells, smoking, sparking, or faceplates that feel unusually warm to the touch . If you notice any of these severe symptoms, there is likely a much bigger, hidden issue with your circuit that requires professional attention before you even think about changing the hardware yourself .
Do I need to pull a city permit for this project?
This is a great question that often trips up enthusiastic DIYers. Permitting rules depend entirely on where you live. However, in many municipalities, homeowners are completely allowed to fix their own wiring or make simple one-for-one repairs and replacements without securing a formal permit .
Because local building codes vary drastically, your safest bet is to place a quick phone call to your local city planning office. Tell them you are doing a simple, one-for-one swap of an existing device. More often than not, they will give you the green light to proceed without any paperwork.
What are the basic steps for an electrical outlet replacement?
The procedure for replacing a standard duplex (two-outlet) wall receptacle is surprisingly similar to replacing a basic light switch . Follow this step-by-step checklist to ensure a flawless and safe installation:
What is a GFCI, and why do some outlets have buttons?
As you shop for replacement parts, you will likely notice some devices have strange buttons in the center. A GFCI (Ground Fault Circuit Interrupter) is a special safety device usually found in wet areas like bathrooms and kitchens .
A GFCI constantly monitors the flow of electricity and instantly cuts the electrical power draw when it senses a dangerous short circuit or water exposure . You can easily identify a GFCI outlet by the prominent TEST and RESET buttons located right on its face . When you finish installing one, you simply press the TEST button on your plug-in tester to confirm the safety shutoff works perfectly .
Are there any hidden dangers I should look out for when I open the wall?
Yes, you must act like a detective when you pull that old unit out of the wall. Little details matter immensely .
One incredibly important thing to check: before you even purchase your replacement outlets, you must make sure that your house does not have outdated aluminum wiring . Aluminum wiring was used in some older homes and requires highly specialized connectors to prevent fire hazards. If you see silver-colored wires instead of copper, stop your project and call a professional immediately.